What do photography and music have in common? If you read the title you already know the answer, composition matters. A sloppily composed piece of music doesn’t capture anyone’s interest and definitely doesn’t communicate the author’s message. The exact same thing is true about a photography, if you don’t take the time to carefully compose your shot it won’t catch anyone’s attention or communicate the moment. There are many things that go into composing a picture, so I am just going to give the introductory information here and will later write articles dedicated to each single element. One important caveat before beginning is these are just guidelines. Not a single one is a hard and fast commandment that can never be deviated from. That does not mean you can just ignore these rules and not worry about them. What this means is if you break one of these rules it should be intentional, not accidental, and you should know why you broke it.
- Find a focal point: When people look at a picture, they want to know what they are looking at and our eyes naturally want to rest somewhere. Where’s Waldo may be a fun game, but most people don’t want a photo album or Flickr gallery that feels like Where’s Waldo. Pick a focal point, and make that point very clear in the image. Think about what captured your attention and try to bring that out in such a way that it captures the attention of whoever is going to be looking at your image later. For a picture to be pleasing, we need a place to focus our attention and rest our eyes as we examine the image. We will look at all the other stuff in the image, but the focal point becomes the destination that makes the journey worthwhile.
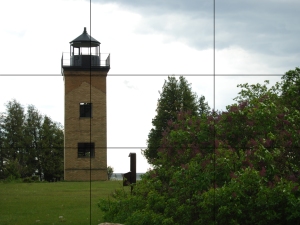
 Learn the rules of thirds: The best way I can describe the rule of thirds is for you to imagine a Tic Tac Toe grid on your pictures (minus the x’s and o’s). At the intersection of the four lines are four points which become the prime positions to put your focal points. Most people (and most digital cameras) naturally want to put the main focal point in the dead center of the image. There are times when that is good, but those times are the exception not the norm. Overcome you and your cameras natural tendencies and compose your shot. Put horizon lines, beaches, buildings, trees, cliffs, etc. along the lines of your Tic Tac Toe grid (in fact, some cameras allow you to put a composition grid right on your display to help you with this- read your manual to find out how). Put the flower, eyes, vase or whatever on one of those prime points. Compose your pictures with the rule of thirds in mind and, I beg of you, resist all your temptation to just point and shoot.
 Keep the lines straight: Have you ever seen an image with the horizon so skewed, you thought the person in the foreground was going to slight right out of the frame? The feeling can be rather disconcerting. If you take a picture with the horizon visible, that thing better be spot on straight or somebody’s gonne get dizzy just looking at your picture. The picture on the right gives a great example of what your horizon should not look like. Even though the rock formation is straight, because that great big horizon line is crooked the whole picture looks off. If there is any line in the picture that is supposed to be straight (a building corner, railroad track, street, yardstick, whatever), make certain that line is straight. The only exception to this is when you are intentionally making the straight line diagonal for some artistic purpose. Crooked should be intentionally done when you are taking the picture, not as a cover up after you see it on the computer and realize you messed up. The composition grid I already mentioned can be a big help in this. If you put your straight line right on one of those grid lines, you will have a that is straight and probably a nicely laid out picture as well.
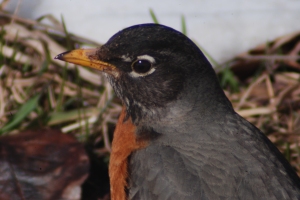
 Fill the frame: This ties in very closely with making your focal point clear. Zoom in tight to your subject and fill the frame with it. It’s hard to miss what you want people to see when that’s all there is to see, isn’t it? If you are taking a picture of your kids, fill the frame with them. If you like the bird in your backyard, zoom in and get that bird as big as possible. I have included a picture that evokes Hitchcockian images in my mind, but I think it gets the point across. There is no question about what the subject is, and I bet you’ve never seen a robin that close before either.
- Watch the background/foreground: When you take a picture you are either looking through a 1/2 inch square viewfinder or staring at a 2 inch square screen. All your attention is focused on whatever is in that tiny little space. You would think you wouldn’t miss a thing, wouldn’t you? Photogrpahers miss important details all the time. Not to long ago I was shooting a church get together, and got down close and tight to a group of kids eating. I was watching the framing and the facial expressions and the light and completely missed the fact that the kid in the front right corner (dead on one of the prime points of composition) was stuffing a great big green bean up his nose. When you take a picture, check out the whole image. Look for beans hanging out of noses, tree branches growing out of ears and street lights mounted on top of someone’s head. Look at all four corners of the image and for all those little things that we look past in the viewfinder.
 Tell a story: Everytime you press the shutter, you had a reason for doing so. OK, not every time. Everyone of you has a strange picture of your toe that you aren’t quite sure when it was taken. All the other times something motivated you to click that pic. Here’s the hard part, taking the picture so that the people who see it later know what motivated you to take the picture. If your daughter in her brand new easter dress drives you to grab the camera, then don’t stand on the other side of the room and snap a picture with her in one corner, the bed in other and the flash bouncing off the mirror in the middle. Put her all by herself, get down low, get in close, have her hold that dress out and spin around while you get a picture of her delighted face way up at the top with all that beautiful dress leading the way up to her shining eyes. Compose your picture so that everyone can see what made you want to take it. For more on this you can read 1000 Words People Want to Hear.
 Use leading lines: Leading lines are lines, rows or some other pattern that draws the eyes along and through a picture. Generally these lines are used to draw the eye to the focal point. You have probably seen a photo of a couple in the background standing on railroad tracks. The rails serve as leading lines to pull your eyes through the whole picture to the focal point, the couple. Using leading lines can be a great tool in pointing people to exactly what you want them to see. In the picture, you can see what I think is great example of leading lines. The snowmobiles on the bottom grab your attention and the curved line of people and machines pulls your eyes all the way through the photograph. If you have been thinking about the other rules I have already mentioned, you will see what I think is the one problem with this image. There is no clear focal point. The lines take you from one edge of the picture straight through to the other edge without letting you stop anywhere to look along the way. Used prooperly, leading lines will guide the viewers attention right to what you want them to see.
- Utilize the negative space: When you use negative space, you are using the other stuff in the picture to highlight the focal point. Simply put, negative space is all the stuff that is not your focal point. Generally, a picture works well when the negative space and positive space balance each other. For some images, though, a captivating tension is produced when one or the other is slightly out of balance. A simple way to get the feel of negative space is to pull out some old photos and a couple sheets of white paper. Go through the pictures and start cropping them with the paper, covering up parts of the photos. As you hide details and shrink the image you change the ratio of positive and negative space. That change will completely change the way the picture feels. You can use negative space to create a sense of balance and rest, or you can use it to create tension in the shot. Utilize the space so that the picture says what you want to say.
 Frame the shot: Putting a frame around the image can greatly enhance the appearance of your photo. I don’t mean a wooden square and piece of glass that helps you hang the picture on your wall. Framing the shot is using some element in the image to make a natural frame within the picture. Framing the shot in this fashion narrows the focus, draws attention to the focal point and gives a sense of depth to the picture. The frame does not have to go all the way around the picture, it can be cover two side, one corner or at times even just one edge of the image. Nor does the frame have to be made of a single object. The picture of the fall lake is framed on the right by a tree and on the top left by a portion of a branch. Those two separate elements form a frame around the picture that force the eyes down to the reflection of the fall colors off a beautiful lake. One other quick thought, a frame is not needed or desirable at all times, but in some situations it can add great interest to an otherwise ordinary shot.
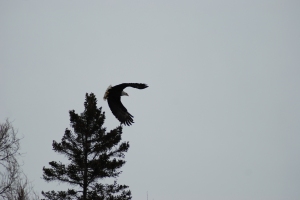
- Watch your colors: Not only are you capturing people and objects when you take a picture, you are capturing colors. Good colors in the photograph can make all the difference. Look for colors that will complement and highlight your focal point. Watch out for colors that will detract from the picture. Most of the time simple is better, as a riot of colors in the background will usually distract attention from the focal point. Good color is color that provides a clear distinction from the focal point while still complementing the whole feel of the photo. Look at the difference in the following two pictures:

 I personally like the action and wing shape of the eagle just leaving the tree much better than the eagle in the other shot. However, because it was a bleak, cloudy day with nothing but a gray sky, what could have been a great image instead just seems drap and uninteresting. The bright blues, and even the little wisp of clouds on the other picture make all the difference. Even though the eagle is less interesting, the picture is far superior because of the color. Give care to your color
You don’t have to be a virtuoso to compose great images, but you do need to consider the layout of the image before you take the picture. This may seem like a lot to remember and think through, but take it a step at a time and keep working at it. In no time at all you will find yourself composing the shot correctly without even thinking about what you are doing.